Thursday, November 30, 2017

Holiday Gift Bags

I thought these fabric bags (sacks?) were adorable with their drawstring and generous 5" x 7" size, and I liked them even more once I finished decorating them with Chalkology Paste!  The ones in the picture below feature the Build-a-Gingerbread-Man Chalk Transfer.  Cute, huh?


The three bags in the next photo feature the following Chalk Transfers:  Winter Woodland Scene and Wise Men.


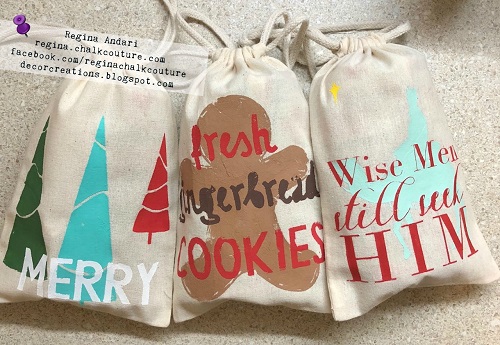
I was amazed at how little time it took to decorate these bags!  Seriously . . . it took longer to decide which images and colors to use, and the Chalkology Paste dried super fast on the fabric.  Although I could have added a fabric medium to the paste so the bags could be laundered, I opted to not do that.  I placed some cardboard inside the bags and just used the paste straight out of the jar.  Chalkology Paste takes quickly to fabric, so I would recommend that you decide where to start and then just place paste on the image, spread it as far as it will go, and then add more paste as needed.  You definitely want to be very careful to not get any paste off of the Chalk Transfer because you can't just wash boo-boos off of fabric.  ;-)

Sunday, November 19, 2017

Chalked ornaments make perfect adornments for gifts

We have a small tree at the mountain house that either needed a nice wrap around the base and/or gifts underneath, so today I wrapped some empty boxes to make it look better.  I found the buffalo plaid gift wrap at Walmart, and I love it! Even if the boxes are empty, a Christmas tree needs packages under it, right?

My apologies for the poor photo lighting.  I look forward to sharing a photo of these beauties after they've been placed under the tree.  That cute lantern that I used on the ornament is from the Outdoors transfer from Chalk Couture, and I'm sorry to say that it has been retired.   The burlap ribbon, Jute Twine, greenery (Boxwood Wreaths), and Green Sprigs are from Stampin' Up! and can be purchased from my web site.


Wednesday, November 15, 2017

"Vintage Truck" Christmas Chalkboard

Oh, the fun I had today working on this Christmas chalkboard!  Well . . . it was really fun until I had to re-do the truck when my placement of the tree image (in the back of the truck) ended up just a tiny bit too high.  I stood back and looked at it, but I just couldn't look past the fact that it was about 1/16" higher than the railing.  If you've never worked with the awesome "Vintage Truck" Chalk Transfer, then you might not know that the adorable truck is a 3-step process.  The first step was the part with the red paste, then the part with the white paste, and then the tree.  It all ended well, though, and it was worth it to me to re-do it.


I love the images that come with "Vintage Truck" because they cover a variety of seasons/holidays.  For instance, the large framed chalkboard that I used today is the same one that had the "Hocus Pocus" Halloween design that I posted HERE.  As much as it pained me to wash away that design, I'd be lying if I said it wasn't convenient to be able to do so!  I like not having to buy a new chalkboard for every design that I want.  Being able to just spritz a design with water and wipe it away is pretty nice.  Of course, if I loved it enough to keep it around all the time, I could just seal it and then buy a new chalkboard.  It's all about the options, right?

Saturday, November 4, 2017

Baby, It's Cold Outside

Oh, if only it felt like November!  I love Fall and Winter but, in North Carolina, Summer seems to be the prominent season, much to my dismay!  I had to switch the heat pump back to A/C last night.  Tonight, though, I had the house to myself so I went to Spotify, turned up the volume, and decided to do something chalky.  I picked up one of the boards that I recently stained and chose to work with Chalk Couture's "Baby It's Cold Outside" transfer.  I just love the mittens, although they don't show up all that well on this board.


If you haven't worked with Chalkology Paste and Chalk Transfers yet, then I'm sure that I can't convey just how fast and easy it is to create a decorative sign like this one.  The colors of paste that I used are Orchid, Caribbean, and White.  As I removed that large snowflake transfer (from the mitten on the right), I thought about adding glitter while the paste was still wet.  It turned out beautifully!  When I was sure the paste was dry, I lifted the board and let the excess glitter fall onto a piece of paper so I could return it to the glitter container.  


It's hard to take photographs at night--harder still to capture the shimmer of glitter, so I had to do some tweaking to the photo.  The colors are truer in the first photo.

If you have any questions about Chalk Couture or want more info, leave a comment or send me an email (see "Contact Me" in the right sidebar, just below my photo).